

Low voltage wiring
Description
Design
Pinout guide
There are a few rules regarding designing the pinout.
- Pins intended to be used together (eg. +3V3, GND and AI for a sensor) should be physically grouped together.
- Ground and power to the PCB should be placed in one of the "corners" of the connector.
- CANbus connection should be placed in one of the "corners " of the connector.
- For PCBs with two CANbus high/low pairs, both pairs should be grouped together.
Rule 1 should ALWAYS be followed, it is intended to reduce the amount of spaghetti wiring on the car.
Rule 4 should also ALWAYS be followed, this is because it allows for creating short CANbus stubs. On a serial bus like CANbus, when the waveform hits a end it generate a reflection. If the length of a stub is too long, depending on the bus speed and length these stub reflection can mess with the bus timing, degrading or completely ruining data transfer.
Rule 2 and 3 are best practice rules intended to standardize designs but can be omitted if they prohibitively affect the trace routing, delaying completion of the design.
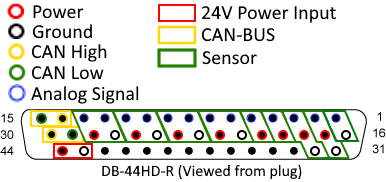
Example pinout
Above is an example pinout demonstrating all four rules. The boxes outline groupings of pins that are used for the same component, the exact way pins are grouped is irrelevant so long as they are physically beside each other (chose a grouping which simplifies your trace routing). Both powe and CANbus interfaces are placed in corners, and the two CANBus interfaces are placed next to each other.
Color codes
| Color | Signal |
|---|---|
| Red | Power (24V/12V) |
| Black | Ground |
| Green | CAN Low |
| Yellow | CAN High |
| Purple | SDC |
| White | Analogue signals |
| Blue | Digital signals |
Useful rule for remembering which color is for CAN LOW and HIGH: "YelLOW is HIGH because that just makes sense".
Headers & connectors
Reasoning
The connectors on the car are standardized, this eases development by removing the need for finding new products matching requirements every year. It reduces the amount of different products and tools kept in stock. The selected connectors have already been proven to work by previous members. If future members want to use different connectors than the once listed below careful consideration should be given to what benefits swapping connectors would provide and why it is necessary.
Note about "legacy" connector series
Some of the connectors on the car are "legacy" connectors. A "legacy" connector, is a connector outside of the connector series listed below. It is in use on the car due to it being part of a old system, the work needed to replace them would be too great or too costly to perform. A good example of this is the AMPSEAL connector for the ACCU MB from AR26. In order to replace this connector a redesign and reproduction of both the motherboard and TSAC would be necessary. So long as systems like this are used on the car the old connectors will remain in use, but it is encouraged to replace this connector with one outlined below in future designs of these systems.
PCBs
Inside enclosures
In this section, "Inside enclosure" connectors refers to headers on a PCBs that are connected to wires running inside a waterproof, sealed during operation enclosure.
| Series Name | Header | Mating part | Crimps | Accessories | Usage |
|---|---|---|---|---|---|
| Molex Mega-Fit | Header | Mating part | Crimps | N/A | Power |
| Würth WR-MPC3 | Single Row, Dual Row | Single Row, Dual Row | Crimps | N/A | Signal |
| Würth WR-MM | Male | Female | N/A | N/A | Board to board |
PCB inn/out of enclosure
In this section, "Inn/out of enclosure" connector refers to connectors/headers on a PCB that goes through an enclosure wall, bypassing the need for running cables inside the enclosure to a dedicated connector in the enclosure wall. This section is for PCB mounted series, for PCB independent series see below.
| Series Name | Header | Mating part | Crimps | Accessories | Usage |
|---|---|---|---|---|---|
| AMPLITE HD-22 | Header | Mating part | Crimps | N/A | Signal |
| Amphenol D-Sub Hybrid | Header | Mating part | Crimps | N/A | Power/Signal |
Inn/out of enclosures
In this section, "Inn/out of enclose" connector refers to connectors that are not mounted directly on a PCB but in the wall of an enclosure, bridging the inside and outside of the enclosure. Wires from "Inside enclosure" connectors can be terminated in these to connect them to the outside world.
Signal
| Series Name | Header | Mating part | Crimps | Accessories | Usage |
|---|---|---|---|---|---|
| AMPLITE HD-22 | Header | Mating part | Male, Female | N/A | Signal |
| Amphenol D-Sub Hybrid | Header | Mating part | Crimps | N/A | Power/Signal |
Power
Peripheral
| Series Name | Header | Mating part | Crimps | Accessories | Usage |
|---|---|---|---|---|---|
| Deutch DTM | Male (unpowered) | Female (powered) | Male, Female | Wedgelocks | Signal |
Wheel encoders
| Series Name | Header | Mating part | Crimps | Accessories | Usage |
|---|---|---|---|---|---|
Power
CANbus
SDC
Analogue and digital signals
Creating the harness

Eye catching image to get you to pay attention to this section specifically
In this section the challenges, solutions to these challenges and the process I have encountered and used in the creation of the AR26/AR27 low voltage wiring harness are documented. Feel free to use this as a reference for designing future harnesses, and please update it with any useful procedures, tips or any other information you deem useful in designing a wiring harness for the benefit of future members.
Wire documentation
Pinouts
In order to create the wiring harness diagram, a overview of the pinout of all the PCBs and components is required. This has historically proved to be a big obstacle to the creation of the wiring harness because members finalize pinouts late in the design phase. In order to mitigate this a new approach is tried for AR27 by utilizing the wiki. Members should begin by designing their systems on the wiki, which features the PCB needs, how these features are implemented, which inputs and outputs are required and first draft of pinout should be present on the wiki before work in Altium starts. (Maybe veteran members also should approve the wiki design in order to ensure all required features are present) This first pinout is just a draft, unless absolute PCB trace spaghetti routing is desirable this pinout will change when the layout is finalized. This is unavoidable and has to be worked around, by getting an initial pinout draft one can begin creating the wiring documentation, pin numbers can be added later when the pinout is finalized.
Documentation
All the pinouts on the car should be collected in a singular place, like a google sheet. It is possible to wire the car based entirely on such a google sheet and Altium, personally I find this cumbersome and like to work from a drawn wiring diagram. For AR26 and AR27 I used PCSchematic, a free education licensed version can be downloaded here.